How do I manage client access and complete a partner handover?
Partners enter client workspaces through Work in or Look in the Partner Console. Client administrators control partner access and consultant seats. A partner handover checks administrator access, saved work, billing, evidence review, and the remaining task owners.
Key takeaways
- Work in permits approved changes under the consultant identity.
- Look provides read-only access for 30 minutes.
- The client administrator controls partner access and seat revocation.
- Return to your own workspace before moving to another client.
Last updated 5 October 2026.
Screenshots use test data captured on 4 and 5 October 2026. Click a screenshot to open the full image.
Before you start
Confirm the client has authorized the work. Identify the client administrator and the person who will accept the handover. Prepare a list of open work, draft evidence, review decisions, and billing questions.
Step 1. Select the access method
| Control | Access | Suitable task |
|---|---|---|
| Work in | Consultant write access. | Edit approved product and evidence records. |
| Look | Read-only access for 30 minutes. | Inspect client information. |
- Open the Partner Console.
- Click
Clients. - Find the correct client row.
- Check the workspace identifier.
- Click
Work inorLookfor the agreed task. - Check the access banner and client name.
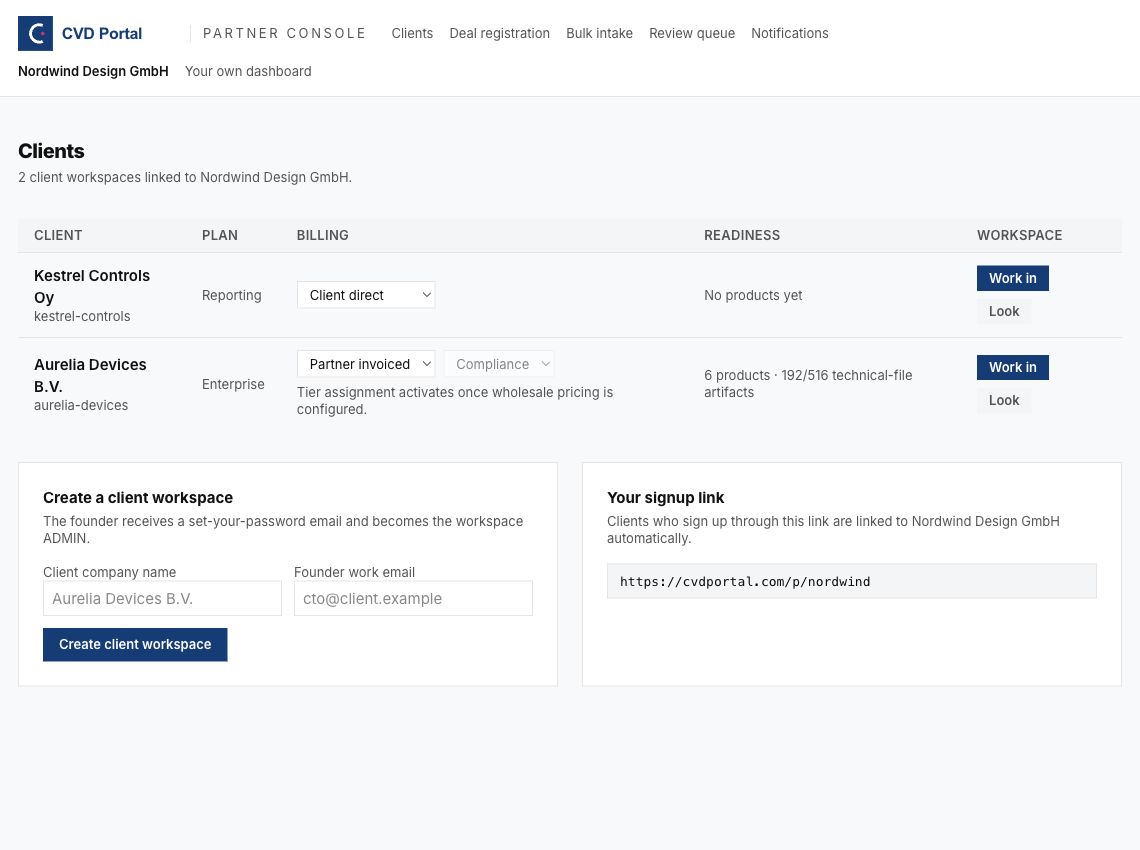
Figure 1. Select the client row before selecting the access method.
Step 2. Check a consultant session
- Find the
Consultant seatbanner. - Read the client name.
- Read the signed-in email.
- Check that the banner states write access.
- Complete only the agreed task.
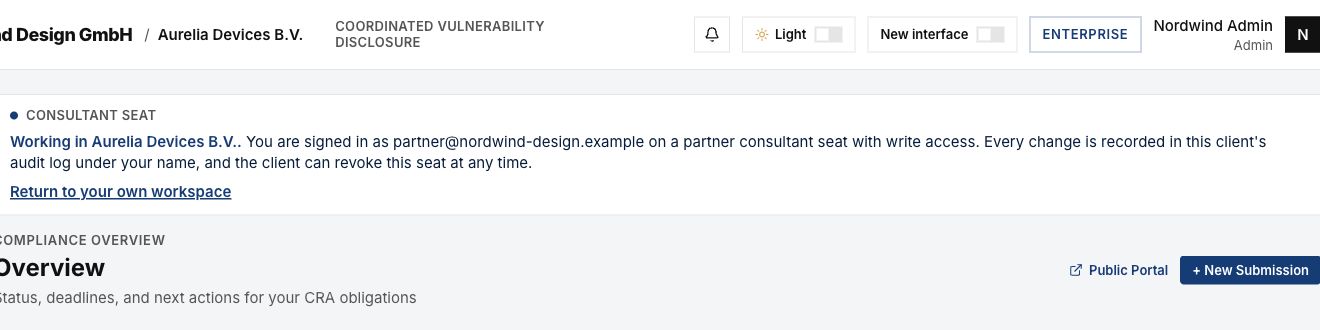
Figure 2. The client audit log records consultant changes under the consultant identity.
The first use of Work in can create a consultant seat. The seat keeps your partner identity. Client billing, account deletion, and partner access controls are unavailable from a consultant seat.
Step 3. Return to your own workspace
- Save changes through the current panel's save control.
- Check the saved result.
- Click
Return to your own workspacein the consultant banner. - Check the partner name in the console.
- Select another client only after the previous session has ended.
For Look, use the exit control in the read-only banner. If the view expires, return to Clients and select the agreed access method again.
Step 4. Ask the client administrator to review access
The following steps belong to the client administrator.
- Sign in to the client administrator account.
- Open
Settings. - Find
Partner Access. - Check the linked partner name.
- Check the current enabled or disabled state.
- Read each entry under
Consultant seats. - Check the email and grant date for each seat.
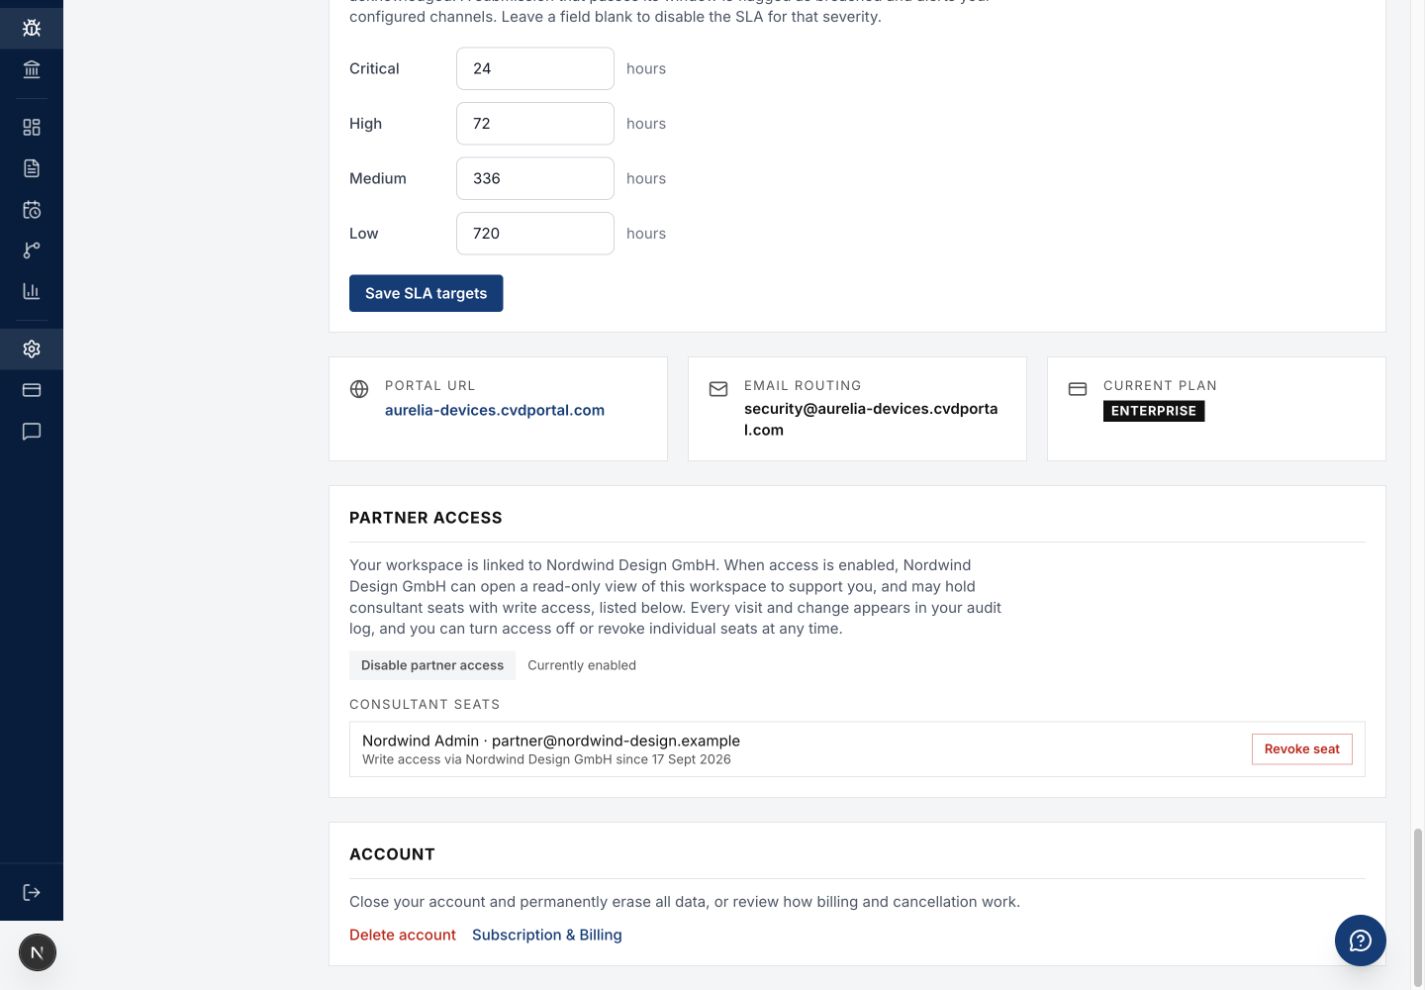
Figure 3. The client administrator reviews and changes partner access.
Revoke one consultant seat
- Find the correct consultant email.
- Agree the revocation with the client team.
- Click
Revoke seatfor that entry. - Wait for the save to complete.
- Check that the seat has disappeared from the list.
- Reload Settings to check the saved result.
Disable all partner access
- Agree the access change with the client team.
- Click
Disable partner access. - Wait for the save to complete.
- Check that the state shows disabled.
- Reload Settings to check the saved result.
Disabling partner access blocks new entry and ends existing partner access on the next request. The client can use Enable partner access to permit access again. Ask the client to check consent before enabling it.
Step 5. Prepare the handover record
- Check client administrator activation and sign-in.
- Record the client workspace and product names.
- Check the saved billing mode and plan.
- List each document that still requires review.
- List each product task that remains open.
- Record export review status and any stale approval.
- Record the owner and due date for each open task.
- Check that the client can find the saved records.
- Agree whether partner access continues or ends.
- Record client acceptance of the handover.
Use the review queue manual to find remaining attention tasks. Use the billing manual to close billing questions.
Step 6. End the work session
- Save the final agreed changes.
- Return to your own workspace.
- Ask the client administrator to apply the agreed seat or access changes.
- Check the client row in Clients.
- Record the access result in the handover record.
Common problems
| Problem | Corrective action |
|---|---|
| Access disabled by client appears in the console. | Ask the client administrator to check the agreed access state. |
| The client banner names another client. | Return to your own workspace. Select the correct client. |
| Look prevents an edit. | Use Work in for approved changes. |
| Partner Access controls are unavailable. | Use the client administrator account for access changes. |
| A client wants to end all partner work. | Complete handover. Ask the client administrator to disable partner access. |
| A revoked seat still has a page open. | Check access on the next request. Ask support if access continues. |
Recommended practices
- Use your own account for each client visit.
- Explain audit records during onboarding.
- Save work before a workspace change.
- Agree access removal before the handover date.
- Keep open work visible to the client.
Completion checklist
- Client administrator can sign in.
- Saved product and evidence records checked.
- Billing and plan checked.
- Open tasks have owners and dates.
- Client accepted the handover record.
- Consultant session ended.
- Agreed seat or access changes checked.