How do I upload and confirm documents for partner clients?
Partners upload client documents through Bulk intake, check each proposed client and product destination, and dispatch reviewed groups. Filed documents become draft evidence in the client workspace. A reviewer confirms supported controls and checks any proposed product context.
Key takeaways
- Check every client and product destination before dispatch.
- Changing a client resets the product selection.
- Dispatch files draft evidence that requires review.
- A confidence label requires a human check.
Last updated 5 October 2026.
Screenshots use test data captured on 4 and 5 October 2026. Click a screenshot to open the full image.
Before you start
Use your partner ADMIN account. Get the client's approval to upload the documents. Check the client workspace, partner access, and technical documentation plan access. Prepare the approved product name and a reviewer for the evidence.
Create and activate the workspace through the onboarding manual. Use the billing manual for plan access.
Step 1. Prepare the files
- Check that each file belongs to an agreed client product.
- Check the document version.
- Open the file to check readability.
- Give the file a name that identifies the client, product, and version.
- Check the file type and size.
- Plan the upload in batches of up to 20 files.
The upload service accepts files up to 15 MB each. The screen still states 5 MB. Use files of 5 MB or less when possible. Supported files include PDF, PNG, JPEG, WebP, TXT, Markdown, CSV, JSON, XML, HTML, and YAML.
Step 2. Upload a batch
- Return to your own workspace if a consultant session is active.
- Open the Partner Console.
- Click
Bulk intake. - Click the file selection control under
Step 1. - Select the prepared files.
- Wait for upload and document reading to complete.
- Read any error beside a file.
- Check the proposed groups under
Step 2.
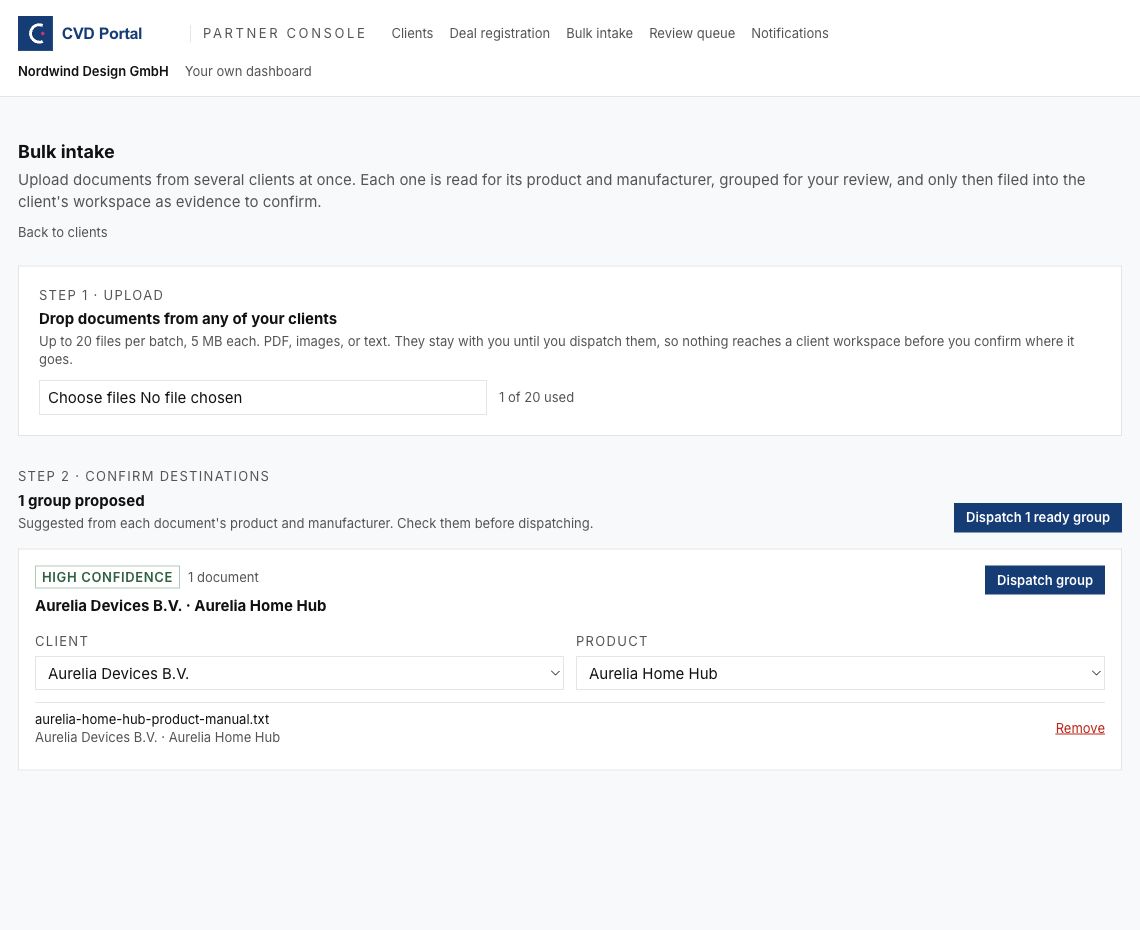
Figure 1. The upload remains in the partner batch until dispatch.
The page resumes the most recent open batch. Check the existing file list before adding files. An upload error can have a Dismiss control. Dismissing the error clears the message. Select the corrected file again to retry.
Step 3. Check the destination of every group
| Destination | Controls | Check |
|---|---|---|
| Existing client and product | Client and Product. | Both names match the document. |
| Existing client and new product | Client and New product name. | The product needs a new record. |
| New client | New client name, Client admin work email, and New product name. | The client needs a workspace and the email is approved. |
- Read the group heading and confidence label.
- Check the manufacturer and product stated for each document.
- Select the correct
Client. - Select the correct existing
Productwhen one exists. - Enter
New product namewhen a new product is required. - Use the document move selector to move a file to another group when required.
- Click
Removefor an incorrect file. - Check the complete group again.
Selecting a client resets the product selector to the new product option. Select the existing product again after each client change. A high confidence match still requires your check.
For a new client, select the new client option. Enter the approved company name, administrator work email, and product name. The dispatch can create a workspace before the plan check prevents evidence filing. If a plan error follows creation, open Clients and check for the created workspace before you retry. Select that existing workspace after the agreed plan is active.
Step 4. Dispatch each checked group
- Check the destination once more.
- Click
Dispatch group. - Wait for the result.
- Read
Filed this session. - Check the client name, product name, and file result.
- Record any failed files.
- Resolve the error before retrying the failed files.
Use the batch dispatch button only after checking every ready group. The batch action skips groups that lack a destination or a required new client email.
A client with partner access off cannot receive a dispatch. Technical documentation access is also required. Ask the client administrator to resolve access or direct billing changes when required.
Step 5. Confirm the draft evidence
- Click
Open workspacefor the filed group. - Check the client name in the consultant banner.
- Check the product name.
- Open
Assess. - Find the document review under the document analysis section.
- Read each proposed control, description, and reason.
- Clear each control selection that the document does not support.
- Check the proposed product context with the client.
- Click the Confirm control when the selected controls and context are approved.
- Check the confirmation result.
- Open
Evidenceto inspect the saved evidence.
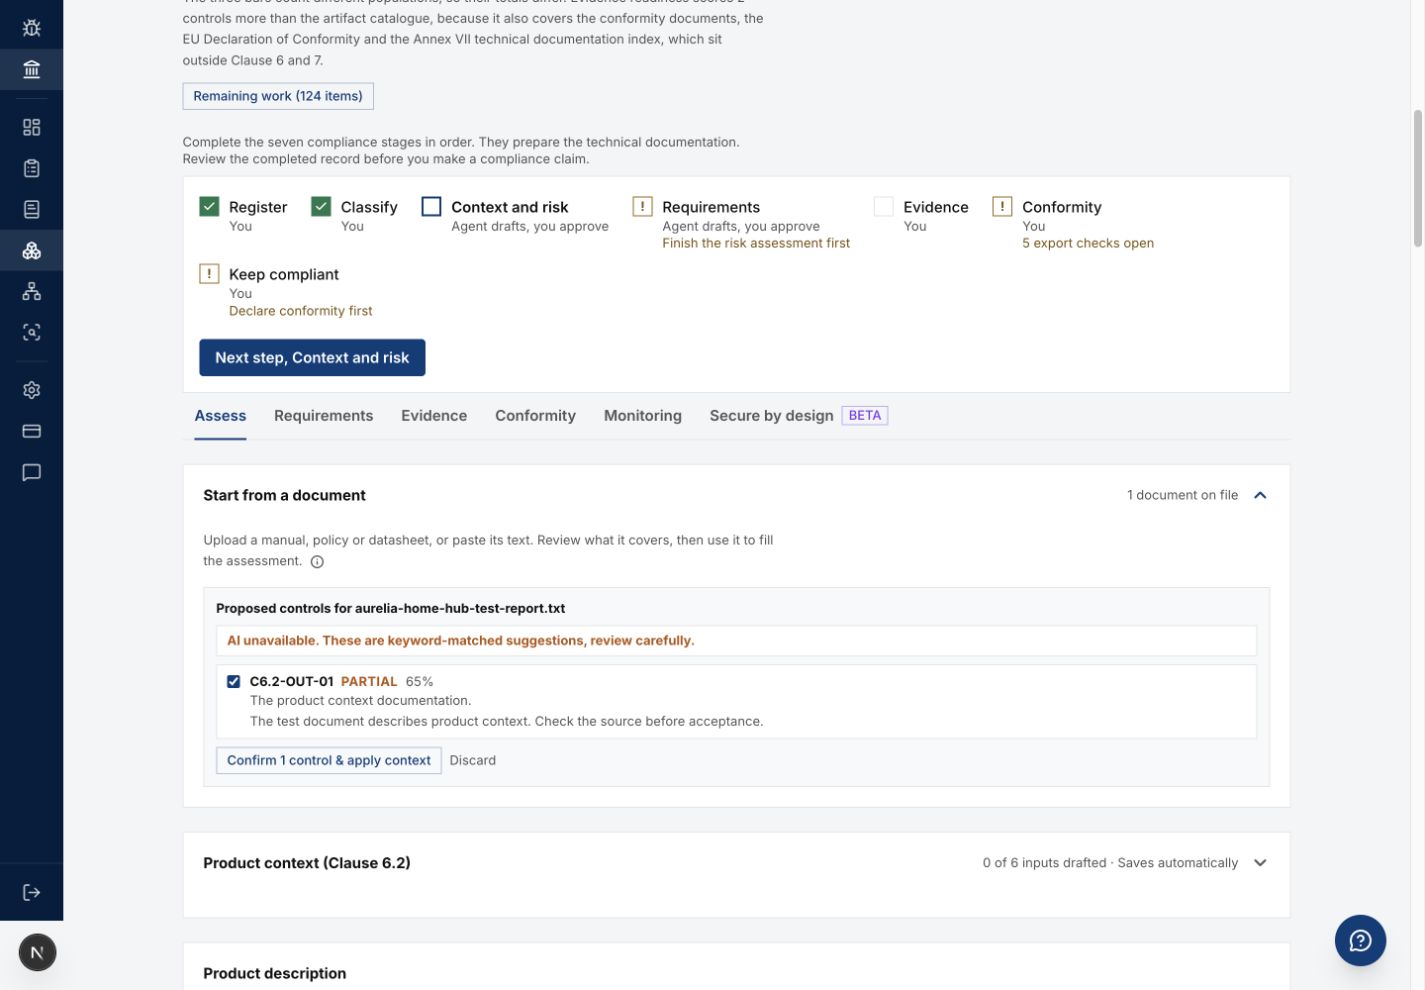
Figure 2. Confirm only controls that the document supports.
The Confirm button includes the selected control count and apply context. The action can update product context. Check that context before confirmation. A document can also propose a product name. Use the name action only when the client has approved the change.
Use Discard for a draft that must be removed. Confirmed evidence can still need validity review through the Evidence controls. Follow the product manual for those checks.
Step 6. Close the batch
- Return to Bulk intake.
- Check all dispatch results.
- Resolve every failed or unassigned file.
- Check that the page reports all files as filed.
- Reload the page when ready to start the next batch.
- Record remaining evidence review work with the client.
Common problems
| Problem | Corrective action |
|---|---|
| A file exceeds the size limit. | Reduce file size or prepare a smaller supported file. |
| A group has the wrong product. | Select the existing product again after the client selection. |
| The client shows access off. | Ask the client administrator to review Partner Access. |
| Dispatch requires a plan. | Check billing and technical documentation access. |
| A new client was created but evidence was blocked. | Check Clients. Activate the agreed plan. Select the existing client before retry. |
| Some files were filed and others failed. | Check the result for each file before retry. |
| Confirm is disabled. | Select at least one supported control. Check that the review is complete. |
| The review uses keyword suggestions. | Check the original document and each proposed control carefully. |
Recommended practices
- Start with one client batch while you learn the process.
- Check document versions with the client.
- Dispatch one reviewed group at a time.
- Confirm evidence before using it in a technical file.
- Record the reason for rejected suggestions.
Completion checklist
- Client approved the uploaded files.
- Every client and product destination checked.
- Every dispatch result checked.
- Failed files resolved or assigned for follow-up.
- Draft evidence reviewed and confirmed where supported.
- Product context changes checked.
- Remaining work assigned.