How do I complete product compliance work for a partner client?
Partners complete product compliance work inside the client workspace on a consultant seat. The product workspace guides classification, context, risk assessment, requirements, evidence, conformity documents, and monitoring. Client reviewers confirm product facts and approve the completed records.
Key takeaways
- Check the client banner and product name before each change.
- Confirm product facts and classification with the client.
- Save each panel through the save method shown on the screen.
- Review generated drafts and evidence before acceptance.
- Export approval and the product export checks are separate controls.
Last updated 5 October 2026.
Screenshots use test data captured on 4 and 5 October 2026. Click a screenshot to open the full image.
Before you start
Complete client onboarding. Confirm partner access and a plan that permits the required product work. Prepare the client product manual, architecture information, test records, and the names of client reviewers.
Agree which product and version the assessment covers. Record unknown information as an open task for the client.
Step 1. Enter the client and open Products
- Open the Partner Console.
- Click
Clients. - Click
Work infor the agreed client. - Check the client banner and your signed-in email.
- Open
Productsin the client workspace. - Check whether the product already exists.
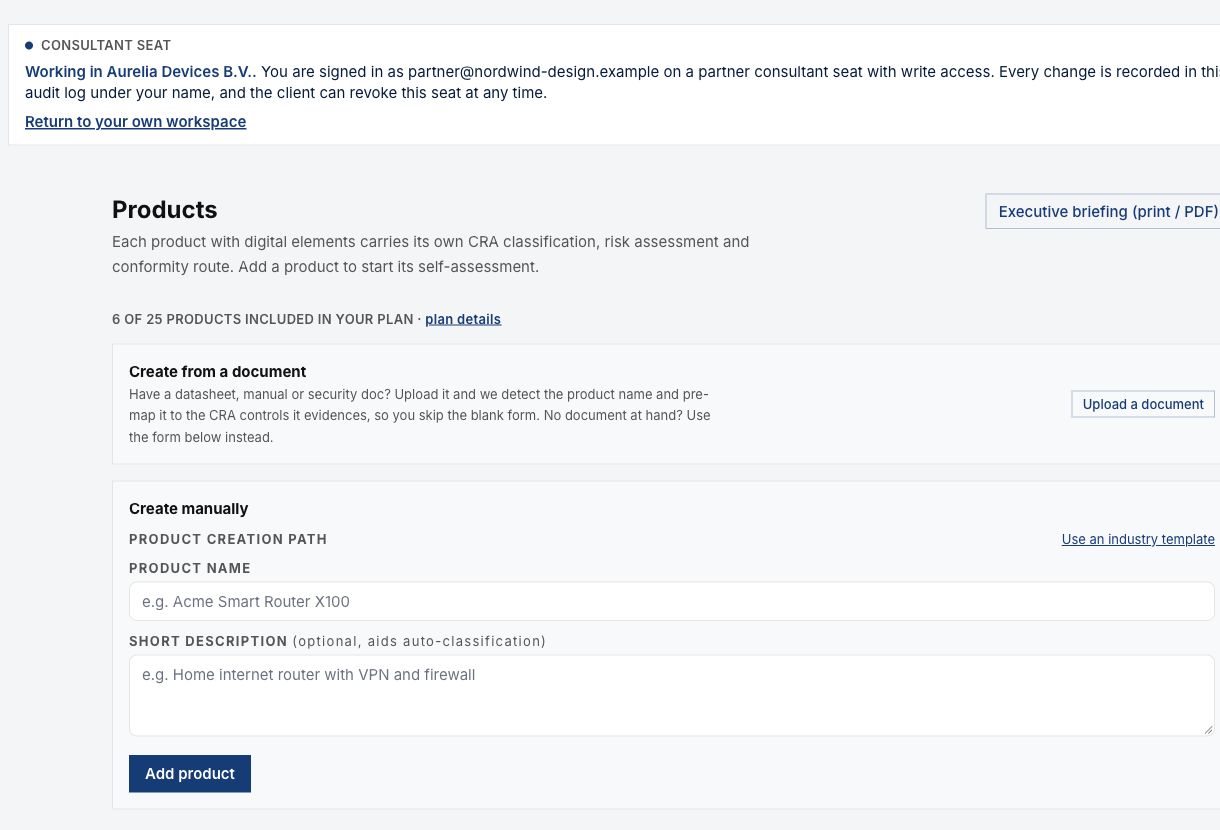
Figure 1. Use the existing product record when one already exists.
Step 2. Create a product when required
- Enter the approved
Product nameunderCreate manually. - Enter the product function in
Short description. - Check the name and description with the client.
- Click
Add product. - Wait for creation to complete.
- Open the new product.
- Check the client and product names.
Use Use an industry template when an appropriate template exists. Check all template facts and proposed entries after creation. A template can prepare starter records. The client still must review those records.
Use Upload a document when the client has an approved manual or datasheet. Check the detected product name and description before creating a record. Follow the document manual for review and confirmation.
Step 3. Read the product work plan
- Read the readiness card below the product name.
- Read the current next action.
- Click
Remaining workto inspect the open work list. - Assign an owner for information you must obtain from the client.
- Open the tab for the current task.
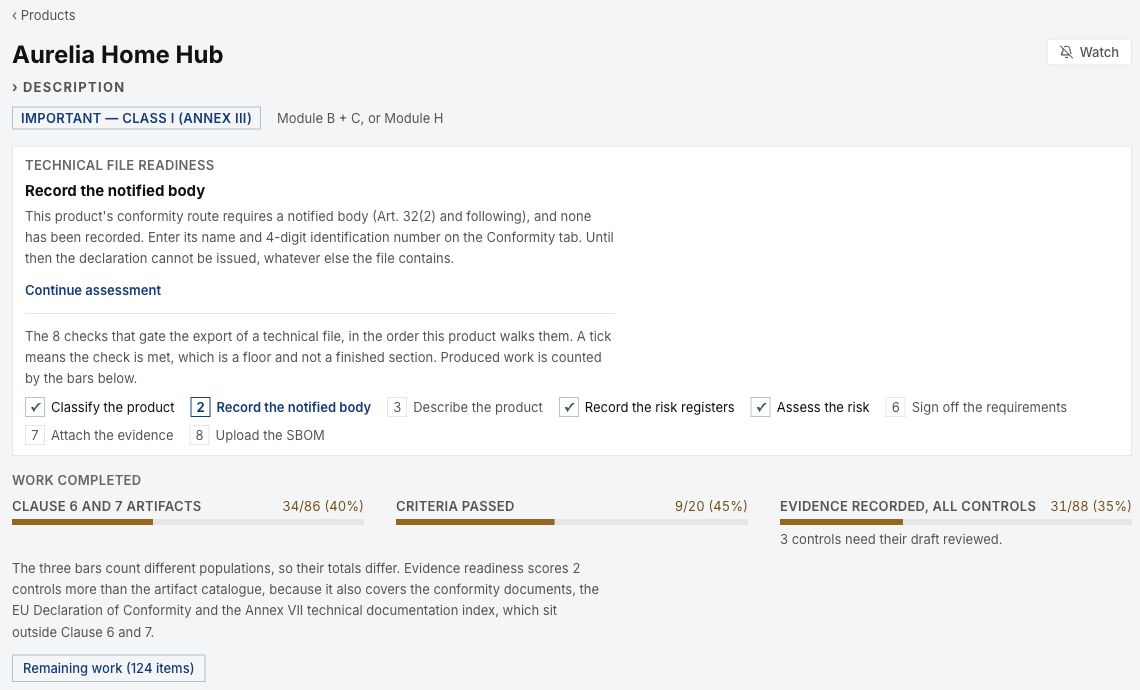
Figure 2. Use the next action and remaining work to plan the product task.
| Tab | Partner work |
|---|---|
| Assess | Classification, context, risk assessment, and document analysis. |
| Requirements | Requirements checklist and clause artifact records. |
| Evidence | Evidence records, acceptance, validity, and related files. |
| Conformity | Export review and conformity document preparation. |
| Monitoring | Review dates, review triggers, and snapshot actions. |
| Secure by design | Engineering playbooks and release gate review. |
Step 4. Confirm classification
- Click
Assess. - Expand
CRA classification (Annex III / IV). - Read any suggested category and the stated scope.
- Check the product's main function with the client.
- Select the approved category.
- Record the classification basis when required.
- Record only standards that the client can support with records.
- Check the displayed conformity route.
- Click
Save classification. - Check the saved classification in the product header.
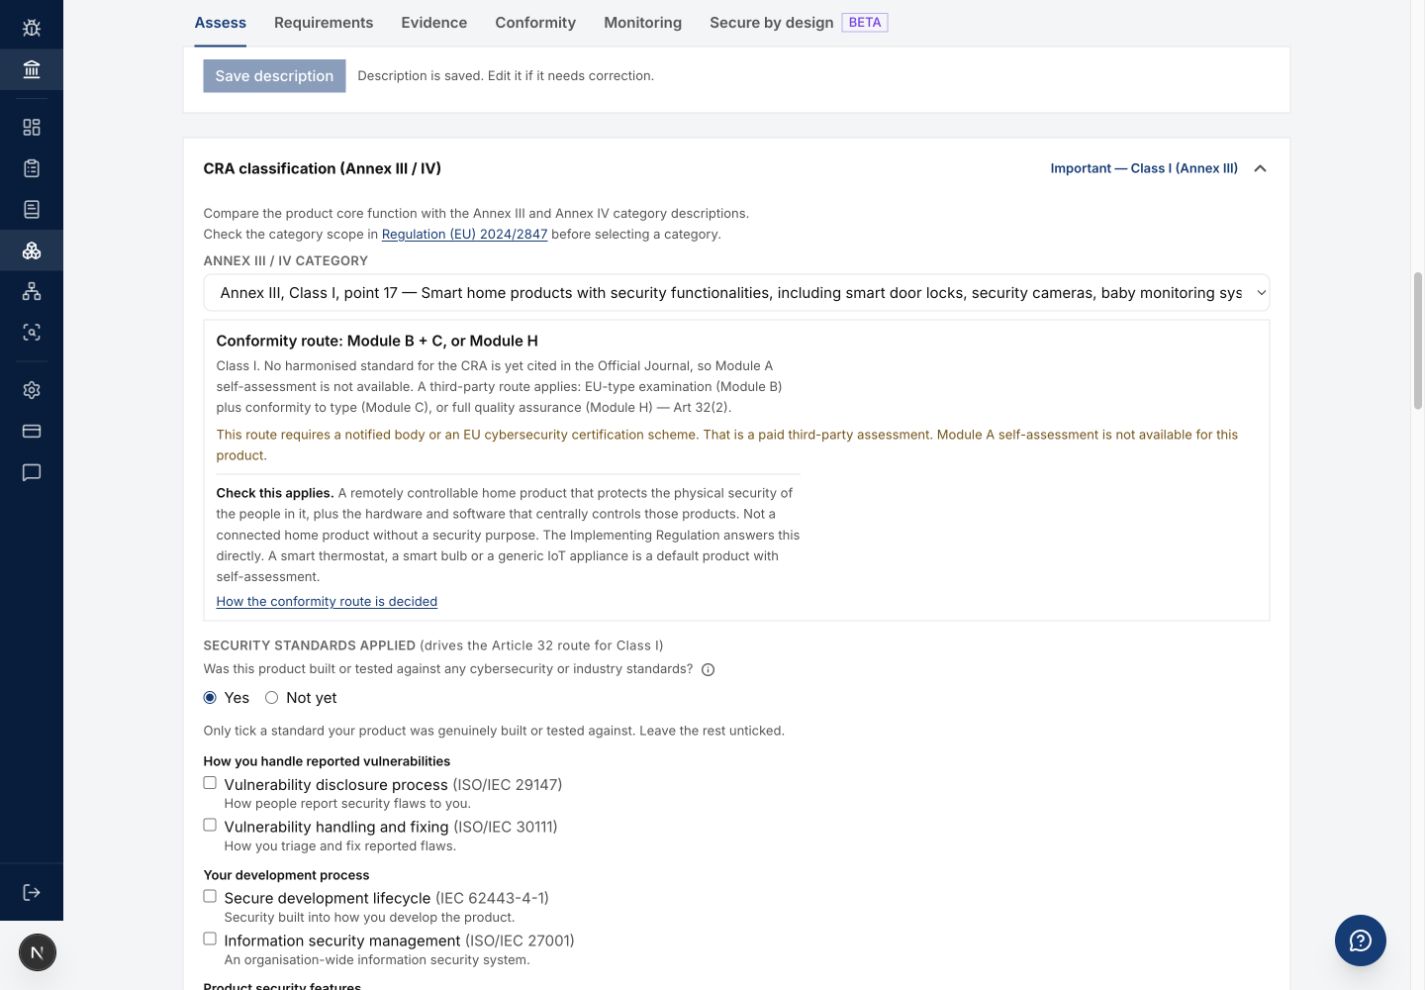
Figure 3. Read the proposed category and route before saving the classification.
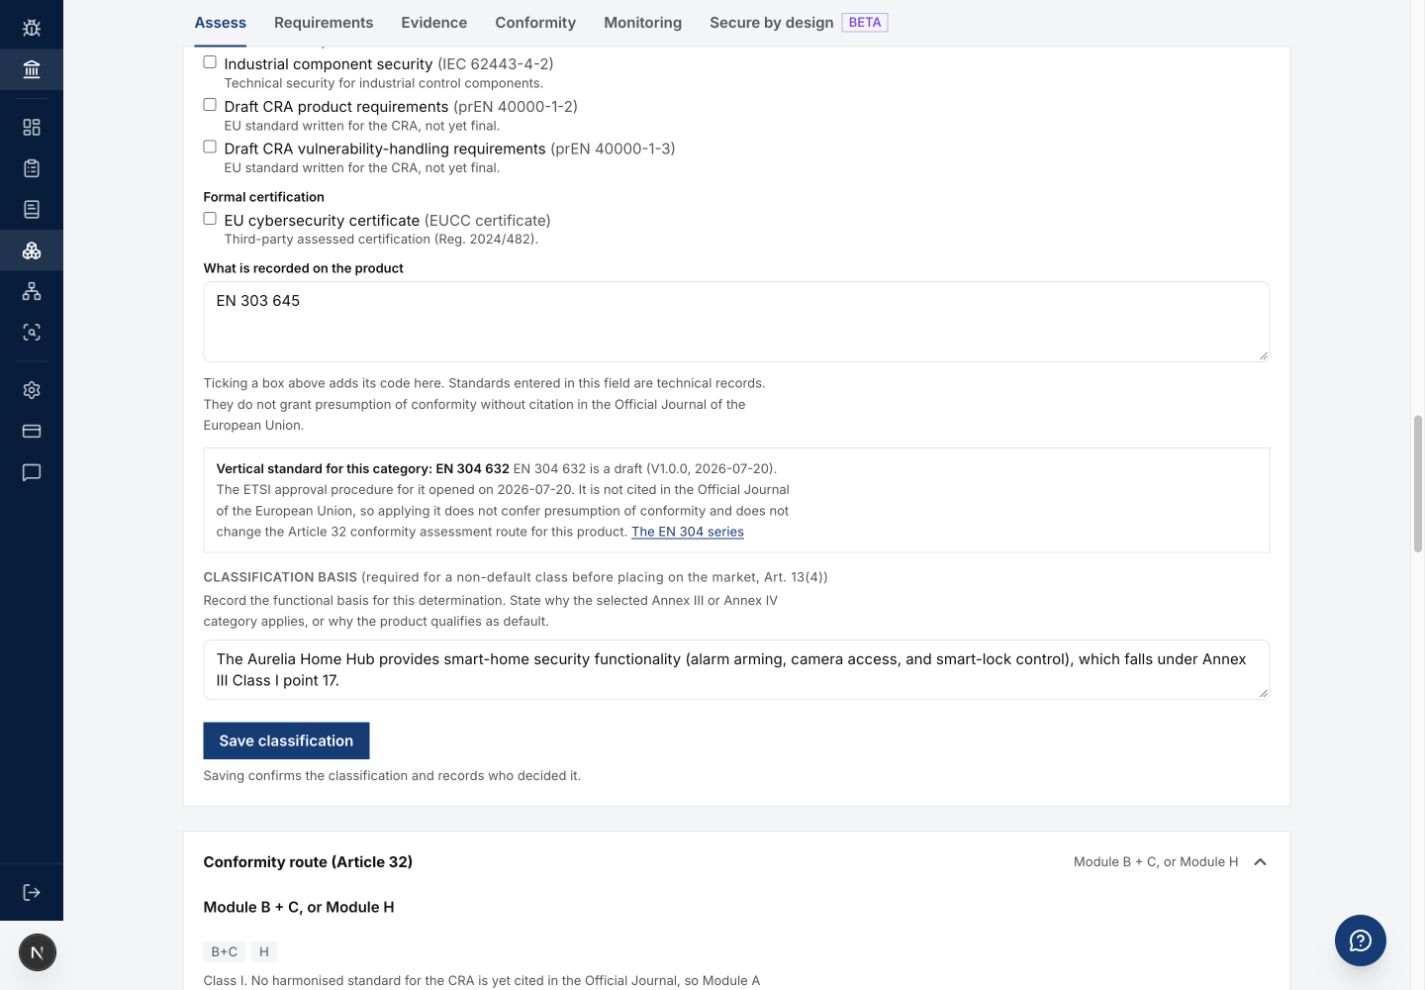
Figure 3a. Check the recorded basis before you click Save classification.
A proposed category requires a decision. Read the category scope and source links in the panel. Ask the client's qualified reviewer to resolve an uncertain category. If the save control is disabled, check the category selection and required basis.
Step 5. Complete product context
- Expand
Product context (Clause 6.2)on Assess. - Enter the approved product context for each input.
- Move focus out of the field when the panel states automatic saving.
- Check the save state.
- Edit the product description when required.
- Click
Save descriptionfor a description change. - Reload the product to check the saved facts.
Use a manual only with the client's approval. Review extracted context before acceptance. Check intended use, interfaces, operating environment, and user capability with the client engineering team.
Step 6. Complete and save the risk assessment
- Expand
Risk assessment. - Check the assets against the product architecture.
- Add missing assets through
Add asset. - Confirm proposed assets after client review.
- Review the data-flow diagrams.
- Review each threat in
Threat model. - Confirm proposed threats only after review.
- Record the approved treatment and remaining risk for each threat.
- Review the applicability decisions in
Essential requirements. - Enter the required justification for each applicability decision.
- Click
Save assessment. - Check the saved assessment and remaining work.
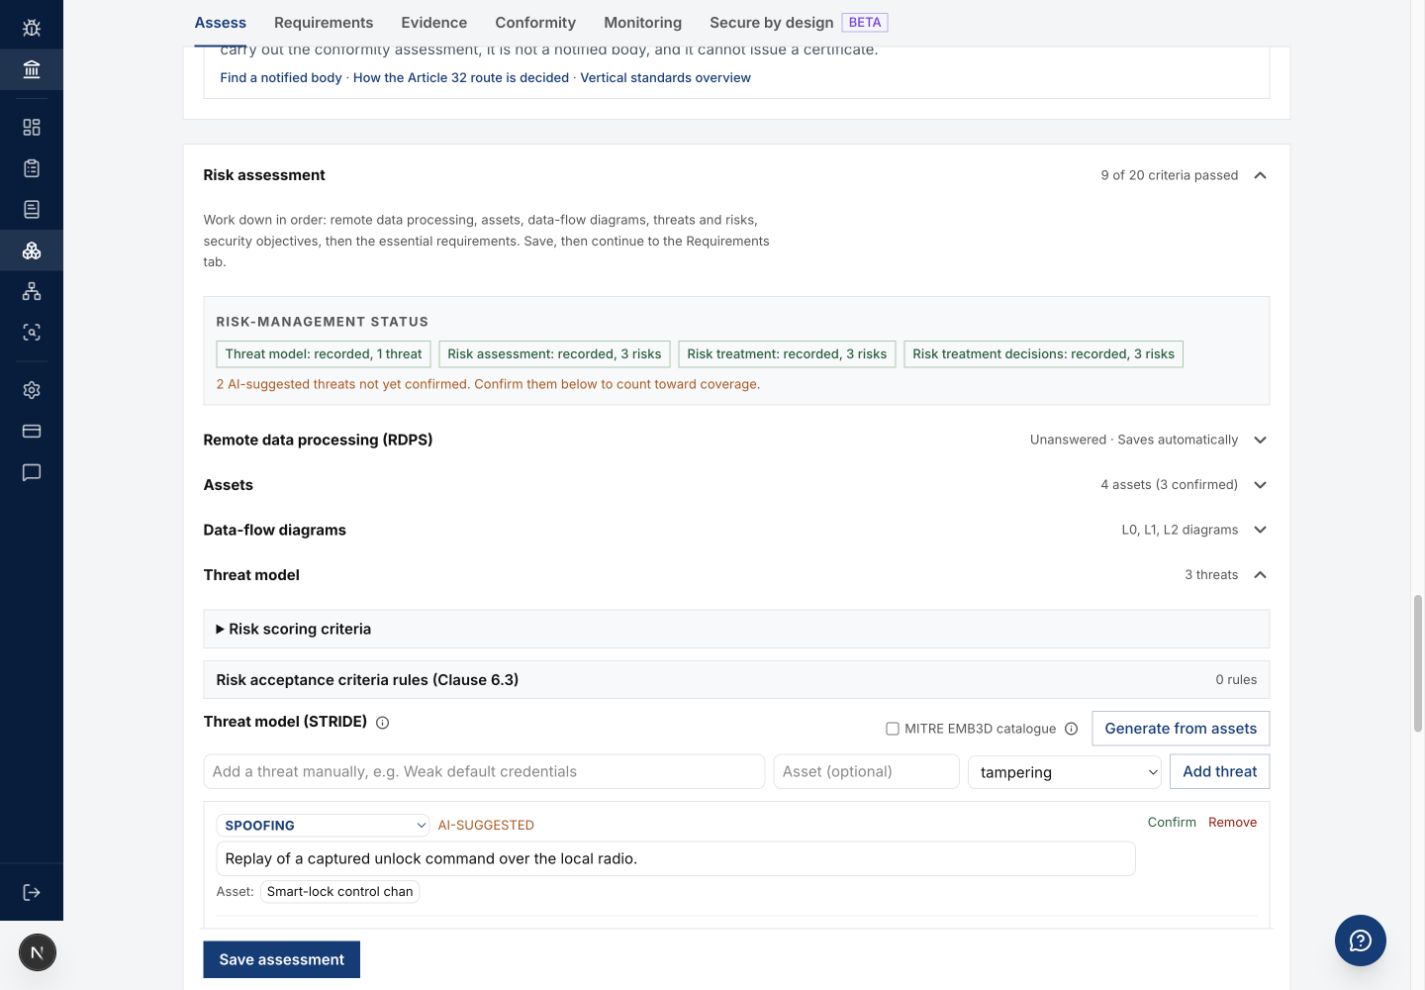
Figure 4. Review proposed assessment entries with the client before confirmation.
Use generated proposals to prepare review work. A generated proposal requires review of the actual product and source evidence. Do not accept an unknown product fact to clear a task.
Step 7. Complete requirements and artifact records
- Click
Requirements. - Open the applicable checklist item.
- Assign the responsible owner.
- Record the planned date.
- Record the supporting evidence.
- Record the remaining risk when required.
- Click
Save checklistafter checklist changes. - Check the Saved message.
- Review the item with the authorized client reviewer.
- Use the sign-off control after the reviewer accepts the item.
- Check the saved signatory and date.
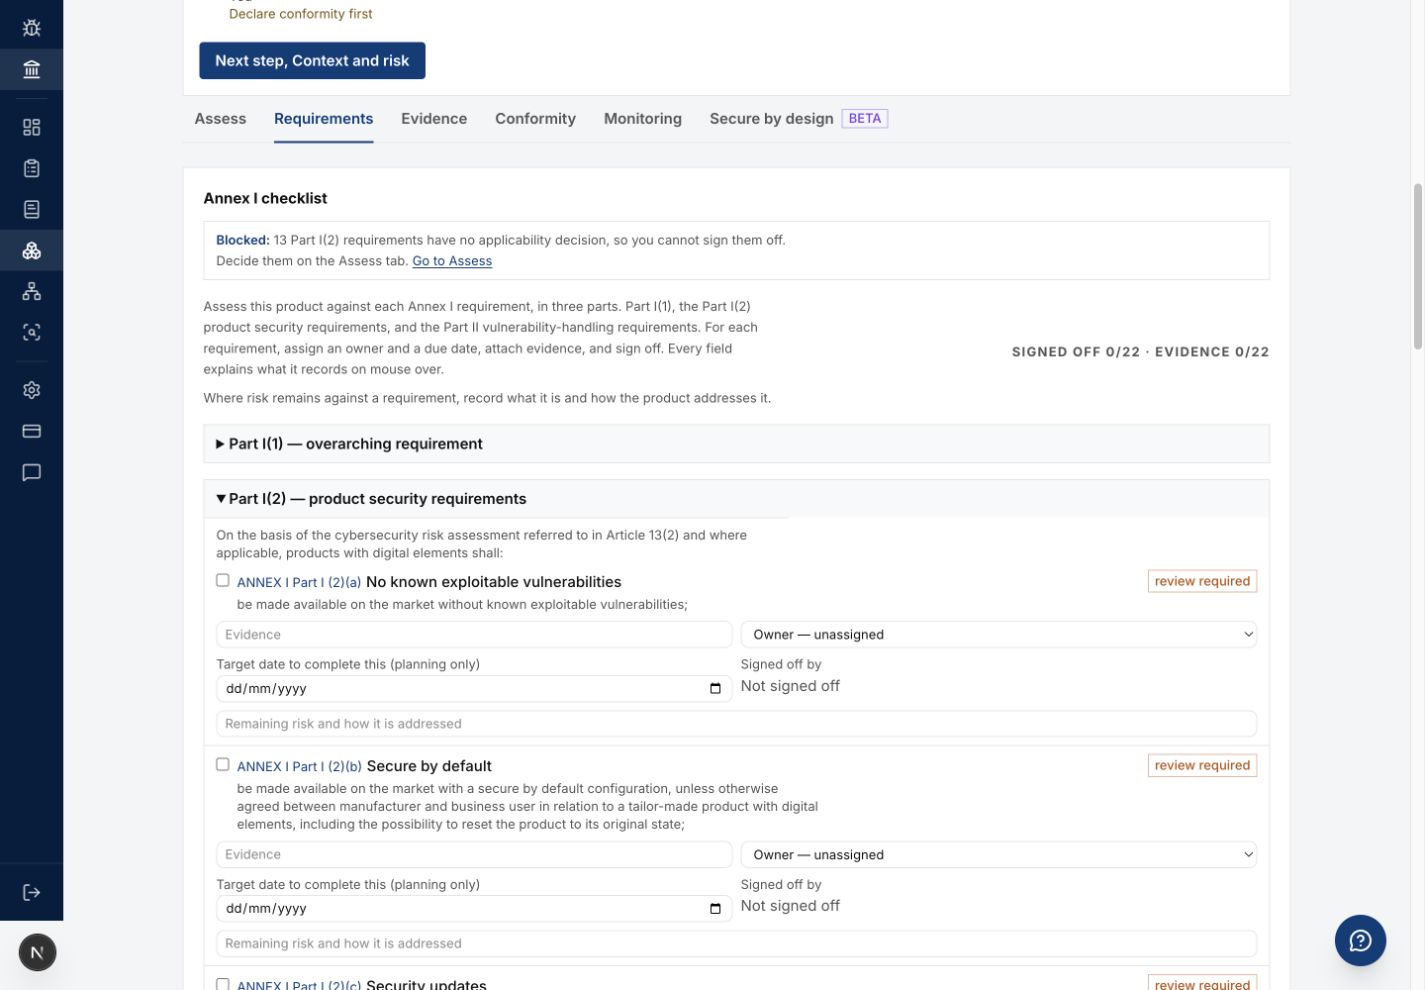
Figure 5. Checklist saves and sign-off actions are separate.
Sign-off records the signed-in identity. Sign-off saves immediately. Evidence, owners, planned dates, and remaining risk use Save checklist. Check both results when you complete an item.
Work through the clause artifact sections on the same tab. Read each artifact's required inputs. Draft the artifact from approved product records. Review the generated content. Save the reviewed record through the artifact controls. Follow the full product procedure for shared product work.
Step 8. Review evidence
- Confirm document suggestions through Assess when required.
- Click
Evidence. - Open the relevant control row.
- Read the evidence title, file, coverage, and current state.
- Check that the evidence supports the control for the assessed product version.
- Accept supported evidence through the row controls.
- Set the approved validity period when required.
- Reject unsuitable evidence through the row controls.
- Check the updated evidence state.
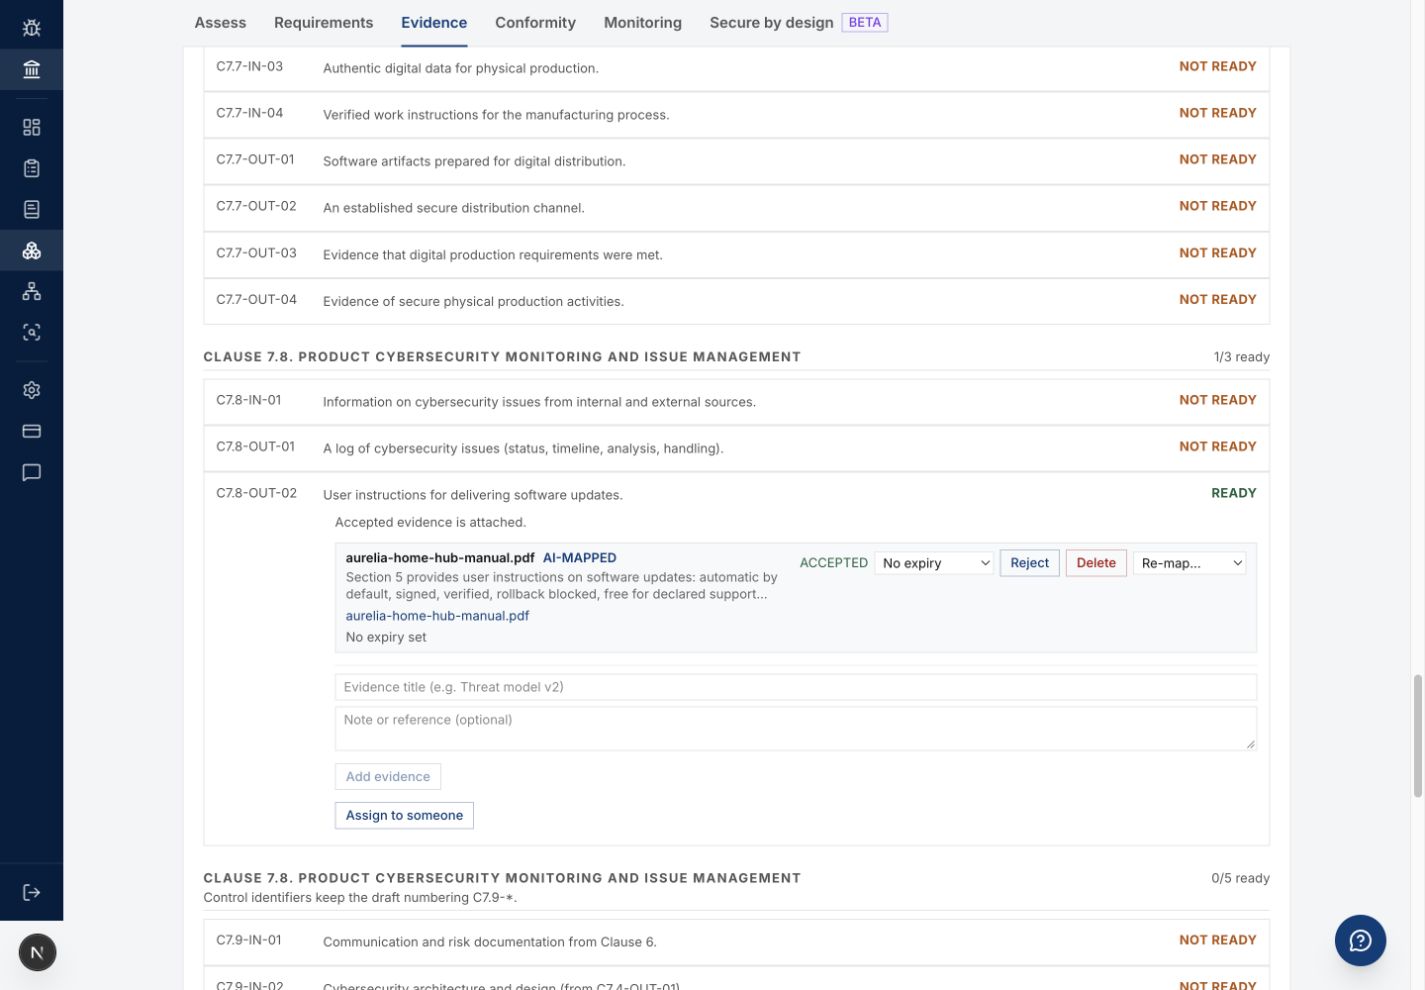
Figure 6. Open a control row to inspect its evidence and review controls.
Evidence marked partial can require more work. Expired evidence needs review. Use the document manual for upload and draft confirmation.
Step 9. Complete engineering playbook review when agreed
- Click
Secure by design. - Open the playbook for the agreed engineering task.
- Read the release gate assertions and supporting evidence.
- Select only assertions that the client engineering records support.
- Click
Save playbooks. - Check the saved gates.
- Use the playbook sign-off control when all required gates are complete.
- Check the saved signatory.
Save the gates before sign-off. Keep unresolved assertions with the engineering task owner.
Step 10. Prepare conformity documents and export review
- Click
Conformity. - Check the manufacturer identity.
- Record the approved manufacturer details when the default is unsuitable.
- Record any required economic operator details.
- Record the notified body details when the route requires them.
- Click
Save notified bodyafter a change. - Review the displayed draft conformity documents.
- Use
Regenerateafter changing source product or manufacturer details. - Record the agreed support period.
- Click
Save support period. - Regenerate and review the user information draft when required.
- Complete
Export reviewthrough the agreed reviewer process.
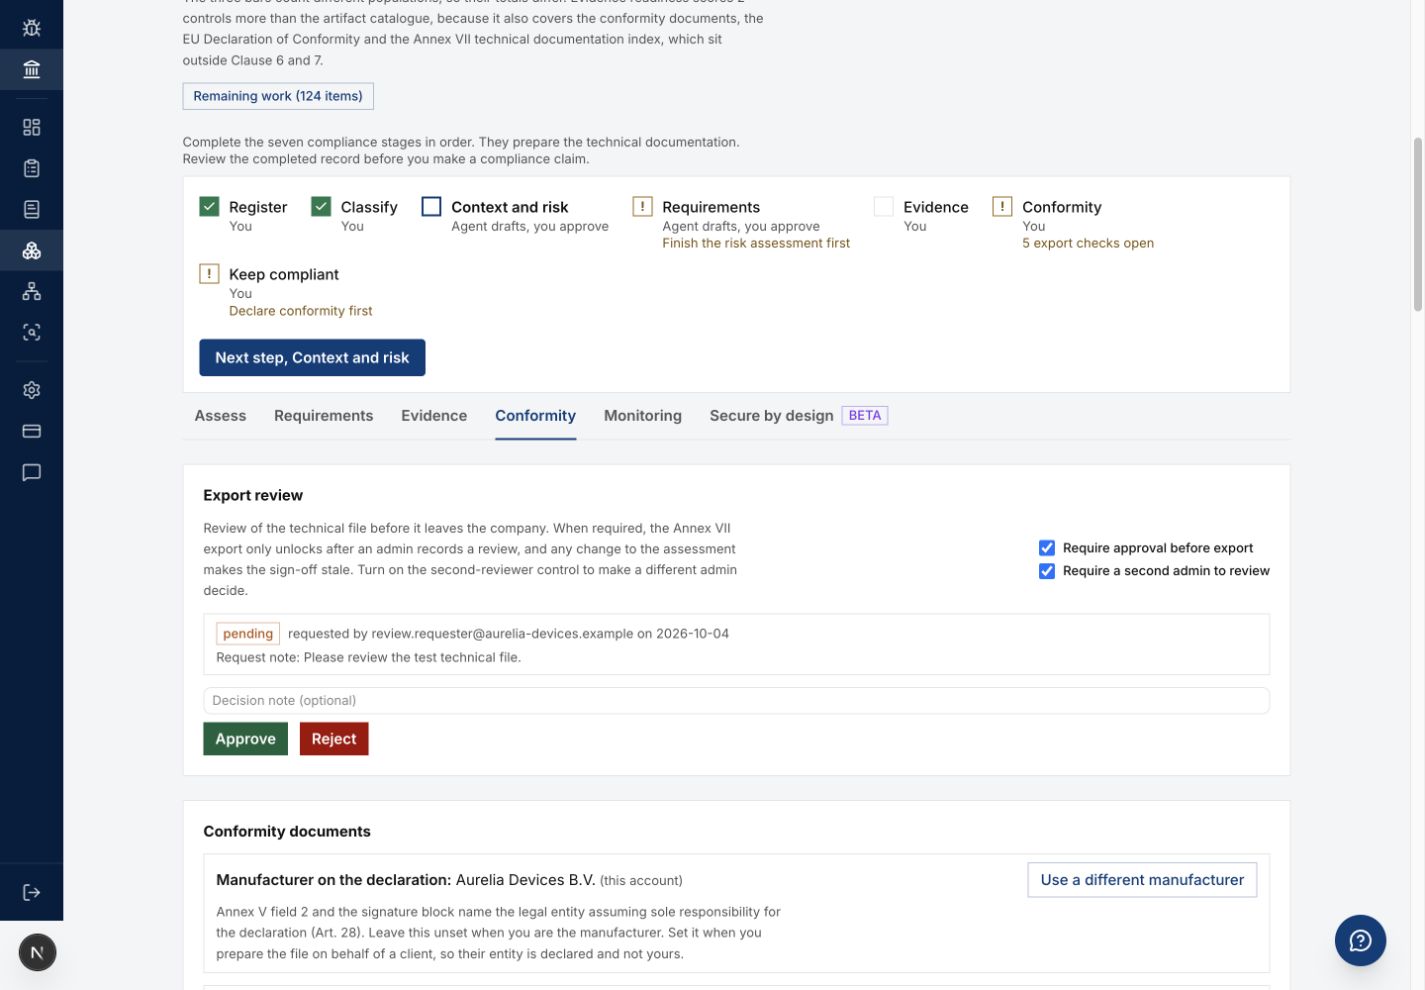
Figure 7. Set the review requirement and second reviewer requirement separately.
Use Require approval before export for the agreed export review gate. Use Require a second admin to review when a different administrator must decide the request. The requester cannot decide the same request when second review is required.
Use Submit for review or Request new review when the current product needs review. Check the resulting pending state. Follow the review manual for approval and rejection.
Generated conformity documents are drafts with placeholders. Obtain the required client review before use. An approval can become stale after an assessment change.
Step 11. Check export and monitoring
- Read the export checks for the product.
- Resolve the failed checks with the responsible client owner.
- Check that any required export approval is current.
- Use the technical file export link for the required format.
- Check the exported product identity and version.
- Click
Monitoring. - Check the review cadence and due date.
- Read each open review trigger.
- Complete the review work for the selected triggers.
- Enter a review note.
- Select only the triggers that the review addressed.
- Click
Mark review complete. - Check the saved review date and trigger state.
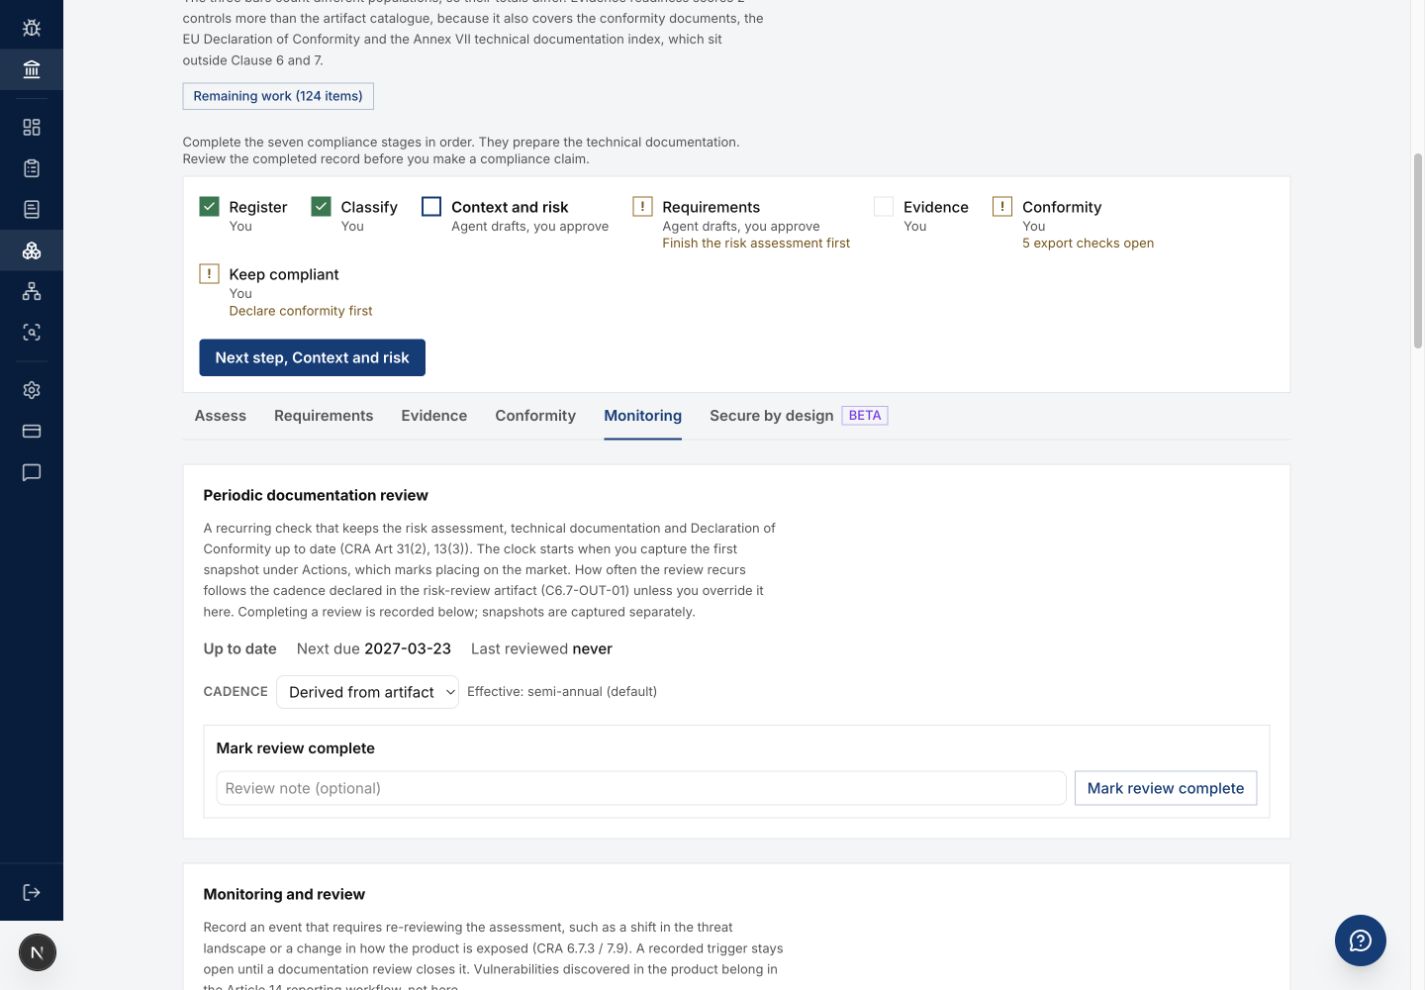
Figure 8. Complete a review before closing its triggers.
Use Capture snapshot with the correct reason when the client has approved a frozen assessment record. Check the resulting snapshot version. A snapshot reason can record a product lifecycle event. Confirm that event with the client before capture.
Step 12. Report the result to the client
- Record the completed product tasks.
- List remaining product and evidence tasks.
- Assign an owner and due date to each remaining task.
- Record the review and export state.
- Agree the next product review date.
- Return to your own workspace.
- Check the client in
Review queue.
Common problems
| Problem | Corrective action |
|---|---|
| Product creation is blocked by the plan. | Check billing, plan access, and the product limit. |
| Classification save is disabled. | Check category selection and required classification basis. |
| A generated record contains an unknown fact. | Get the client fact before accepting the record. |
| Checklist changes disappear. | Check Save checklist and the Saved message before leaving the page. |
| Sign-off is unavailable. | Check saved gates and the required reviewer role. |
| Approval is stale. | Complete the product changes and request a new review. |
| Export fails after approval. | Resolve the other export conformance checks. |
| A monitoring trigger remains open. | Check that the completed review selected and addressed that trigger. |
Recommended practices
- Assess one agreed product version at a time.
- Get engineering input for architecture and risk facts.
- Review generated content against source documents.
- Save checklist changes before signing off.
- Complete changes before requesting export review.
- Keep client acceptance and open work with the handover record.
Completion checklist
- Client and product identity checked.
- Product facts and classification reviewed with the client.
- Context and risk assessment saved.
- Requirements have owners and supporting records.
- Evidence reviewed and validity checked.
- Generated drafts reviewed.
- Export review and export checks checked.
- Monitoring tasks and next review date recorded.
- Open work has named owners.
Complete the client handover checks when the engagement ends.