How do I prepare my partner account for client work?
Partners prepare for client work by checking partner account access, confirming client responsibilities, testing the Partner Console, and setting notifications. Each client task starts with a check of the active client workspace and the agreed scope.
Key takeaways
- Partner Console access requires an ADMIN account for the partner owner company.
- The client administrator owns the client workspace.
- Consultant seats record changes under the consultant identity.
- The partner must agree billing and review responsibilities with each client.
Last updated 5 October 2026.
Screenshots use test data captured on 4 and 5 October 2026. Click a screenshot to open the full image.
Before you start
Confirm that CVD Portal has enabled your partner account. Prepare your own sign-in details and the partner agreement. Ask your team to identify the person responsible for client onboarding, document review, approvals, and billing.
Step 1. Check Partner Console access
- Sign in to your partner company account.
- Open the Partner Console.
- Check the partner name in the header.
- Click
Clients. - Check that the page shows the linked client workspaces or the empty client list message.
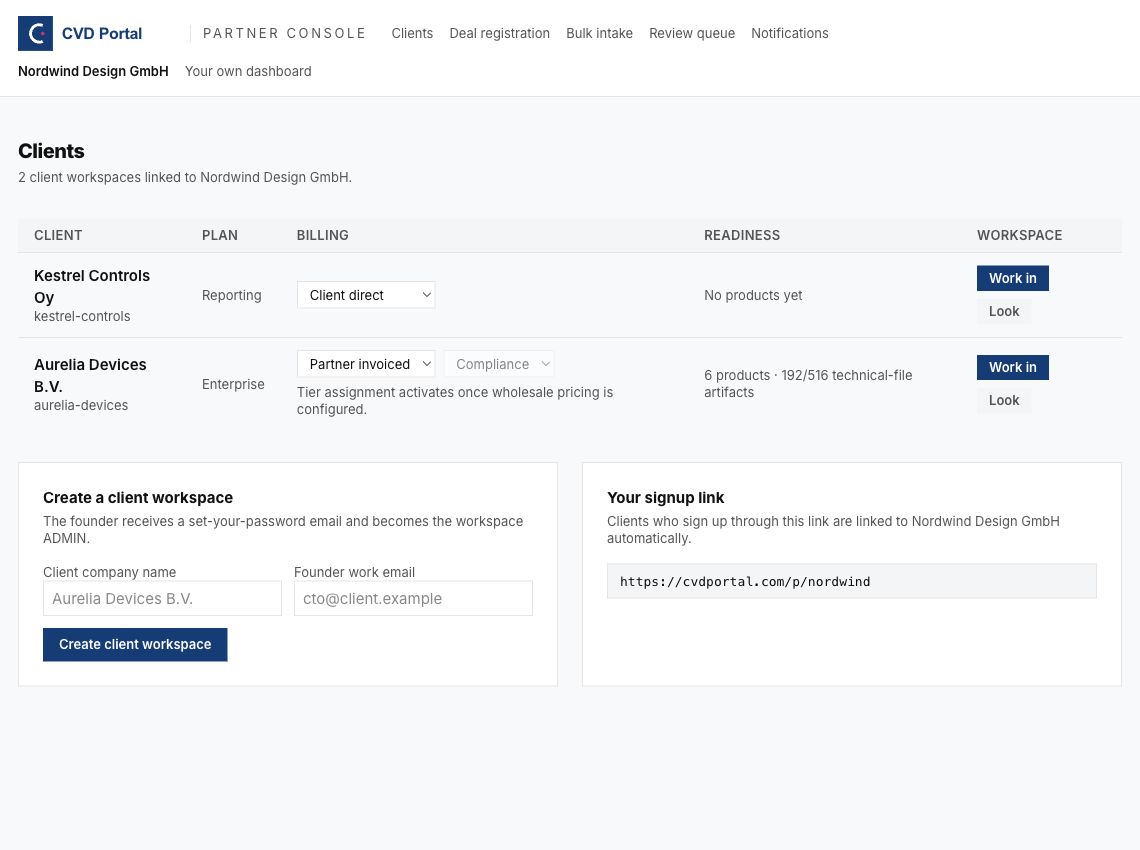
Figure 1. The console holds tasks across client workspaces.
If the console opens your own dashboard, check your account role. The account must have ADMIN access in the company that owns the partner account. Ask support to check setup if the role is correct.
Step 2. Read the console controls
| Control | Task |
|---|---|
| Clients | Create clients, check activation, set billing, and enter workspaces. |
| Deal registration | Register a prospect and check registration status. |
| Bulk intake | Upload documents and confirm client and product destinations. |
| Review queue | Find client work that requires attention. |
| Notifications | Set partner email preferences. |
| Your own dashboard | Open the dashboard for the active workspace. |
A consultant session can remain active when you open the console. Use Return to your own workspace in the consultant banner before you start work for another client.
Step 3. Agree responsibilities with the client
- Confirm the client administrator work email.
- Record the approved product scope.
- Record the agreed billing mode and plan.
- Identify the person who supplies product facts.
- Identify the person who reviews evidence.
- Agree who requests and decides export reviews.
- Agree how the partner reports open work to the client.
- Agree the end of the partner engagement and the handover checks.
Keep the agreement with your project records. Ask the client administrator to keep control of the administrator account and its password.
Step 4. Set notifications
- Click
Notifications. - Check the email recipients above the settings.
- Check each On or Off button.
- Click
Offto enable a required notification. - Check that the button shows
On.
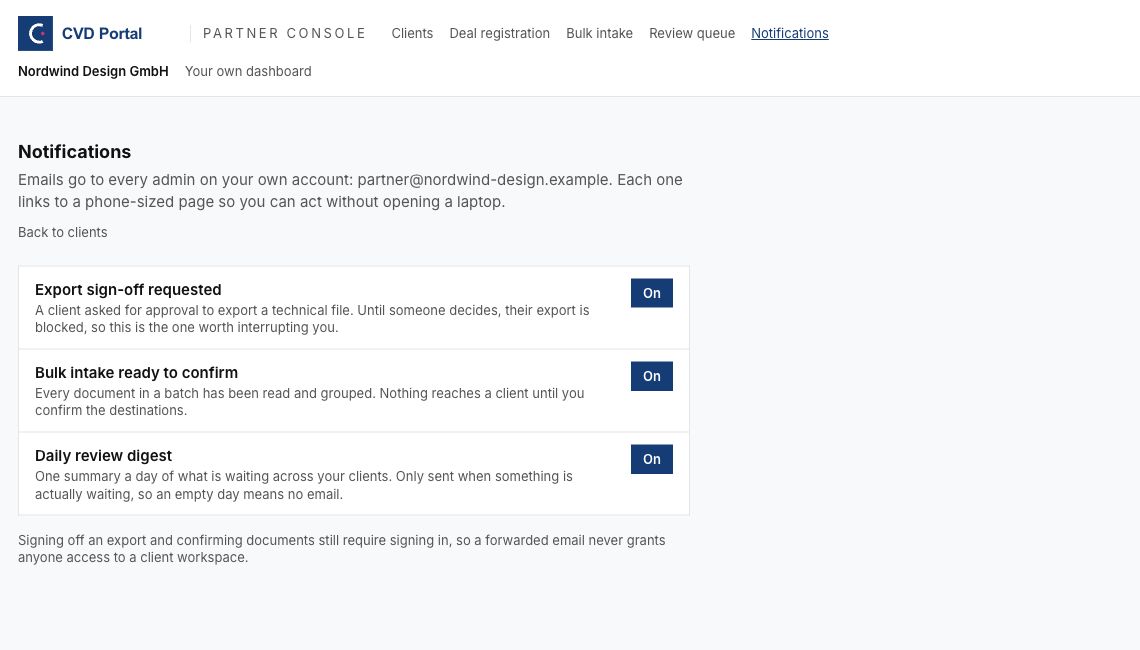
Figure 2. Notification settings apply across the partner account.
Follow the notification manual for all settings and email actions.
Step 5. Prepare a client work session
- Open
Clients. - Find the agreed client.
- Click
Work infor approved changes. - Check the client name in the consultant banner.
- Check your signed-in email.
- Start the agreed task.
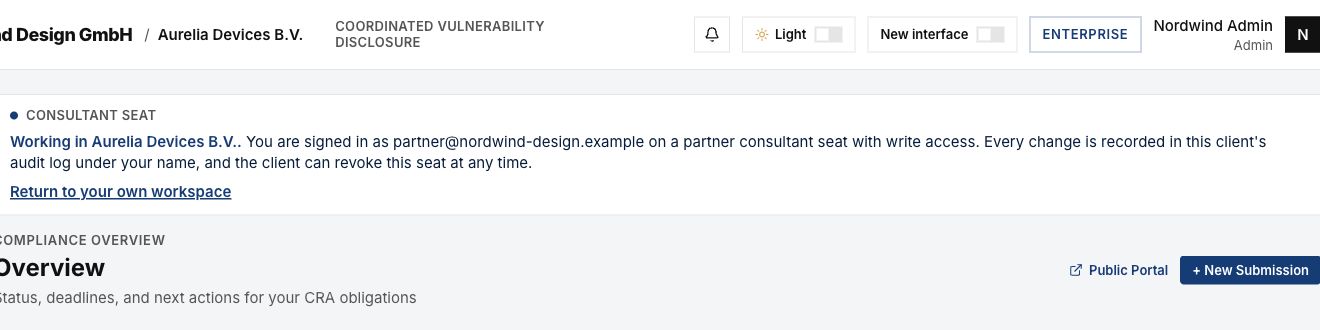
Figure 3. The banner identifies the workspace that receives your changes.
Use Look for a read-only check. Use the access manual to return to your account and manage handover.
Common problems
| Problem | Corrective action |
|---|---|
| The partner name is wrong. | Sign out. Sign in with the approved partner company account. |
| A client is missing. | Check account activation and the partner link with support. |
| A team member cannot use the console. | Check the team member's role in the partner owner company. |
| The client banner shows another client. | Return to your own workspace. Select the correct client. |
Recommended practices
- Assign one person to each client task.
- Keep client approval records with the project.
- Use a separate work email for each team member.
- Check client identity before each change.
- Review partner account access when a team member leaves.
Completion checklist
- Partner name and ADMIN access checked.
- Task owners identified.
- Client scope and billing agreed.
- Notification settings checked.
- Consultant banner understood.
Continue with the client onboarding manual.